If you’re experienced with pallet racking systems and warehousing operations, you know how crucial it is to keep a safe and efficient storage environment. Damage to pallet racks from forklift collisions or other incidents can reduce their load capacity and, more critically, affect the system’s stability. Fortunately, repairing the rack can be easier than you might expect with custom pallet rack repair kits. These kits are commonly used to address issues such as upright dents, twisting, crimping, punctures, missing braces, and damage to struts and footplates.
Advantages of Pallet Rack Repair Kits
- Cost-effective – shorter lead times and minimal labor
- Minimally disruptive – no need to unload entire rack
- Requires less space for material staging
- Easy to install rack guards and reinforcements to prevent future damage
- Larger baseplates provide extra anchor points in the slab
- Usually does not disrupt in-rack sprinklers and electrical systems
Pallet Rack Repair Step-by-Step Guide
Before starting your rack repair, ensure your team is equipped with the appropriate personal protective equipment as specified in your facility’s safety guidelines.
PPE Equipment
- Safety glasses
- Protective footwear
- Hard hats
- Gloves
Tools Needed
- Band saw
- Rack repair jack
- Level
- Drill
- Marker
- Tape measure
- Hammer/mallet
- Vacuum
- Ratchet
- Remove pallets from the damaged rack bay.
- If the damaged section is below the first beam level, take out the floor-level pallets on both sides of the damaged frame.
- If the damaged section is above the first beam level, remove all pallets from the first level of both bays adjacent to the damaged frame.
- Ensure you have all the required tools for the installation and verify that you have the necessary repair kit and hardware.
- Place the hardware in a location where it is easily accessible.
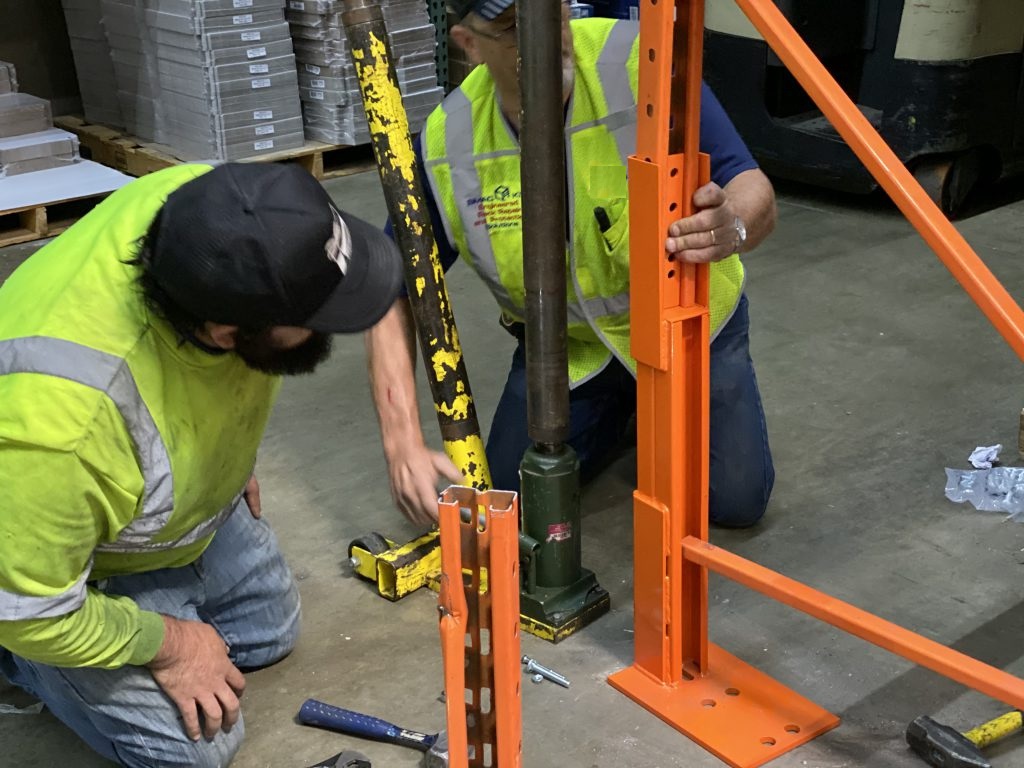
Jack Installation
- Place the jack at the front of the column. You may need to raise the jack head until the pins align with the punch holes on the column.
- Slide the rear pins through the holes on the back of the jack head.
- Determine the cut height for the damaged frame from the repair kit and transfer this measurement to the undamaged frame of the same type. After that, mark the damaged frame for cutting.
Cutting Damaged Components
- Remove the nut from the front anchor, then jack up the column by approximately ⅛” to ¼.”
- Use a Sawzall to cut the anchor and a portable band saw to cut out the damaged components, starting with the rear strut connections and moving to the front column.
- Ensure you follow the pre-marked lines on the components for safe installation.
- Take your time and avoid rushing, as an uneven cut could make the repair kit ineffective in this location.
- Clear away debris and pound any remaining anchors into the ground to prepare for the repair kit installation.
Pallet Rack Repair Kit Installation
- Slide the repair kit into position and clamp it to the existing column. Note that the existing column will not yet be supported by the repair kit’s platform.
- Insert bolts for the front and rear column connections and hand-tighten them. Depending on how well the slots and existing column punch holes align, you might need to use the jack to properly position the bolts.
- Lower the jack so that the existing column now rests on the repair kit’s platform. Do not disconnect the jack from the column at this stage.
Tightening & Anchoring
- Use an impact wrench to tighten the bolts, drill anchor holes at a slight angle, and hammer the anchors into place.
- Tighten all carriage bolt connections with an impact wrench, following a “star” pattern for the front bolts.
- Verify that the bay spacing on either side of the kit is correct and make any necessary adjustments before attaching struts and anchoring.
- Position the diagonal strut connection bracket and mark the connection points on the repair kit for installation.
- Drill the anchor holes with an impact drill. Install the anchors at a slight angle due to the bottom horizontal strut on the kit. Ensure the holes are deep enough to accommodate as much of the anchor as possible to meet embedment standards. There should be (2) anchors for the front column and (1) for the rear.
Clean Up & Final Checks
- Vacuum any remaining debris to prevent it from spreading when hammering the anchors into place.
- Hammer the anchors in and torque them to specification using an impact wrench.
- Vacuum any leftover debris once more.
- Remove the clamp and carefully slide the jack out of position.
- Confirm that all procedures have been followed and ensure that the kit is securely in place.
FAQ’s
What are pallet rack repair kits used for?
Pallet rack repair kits are designed to address various types of damage to pallet racking systems, such as upright dents, twisting, crimping, punctures, missing braces, and damage to struts and footplates. They help restore the integrity and stability of the rack system, ensuring it can safely hold its intended load.
What are the advantages of using a pallet rack repair kit?
Repair kits are cost-effective and offer shorter lead times with minimal labor. They are minimally disruptive, as there’s no need to unload the entire rack. The process requires less space for material staging and allows for easy installation of rack guards and reinforcements to prevent future damage. Additionally, larger baseplates provide extra anchor points and the repair typically doesn’t affect in-rack sprinklers or electrical systems.
What personal protective equipment (PPE) is needed for rack repair?
Ensure that your team is wearing safety glasses, protective footwear, hard hats, and gloves as specified in your facility’s safety guidelines. This PPE is crucial for protecting against potential hazards during the repair process.
What tools are required for repairing pallet racks?
You’ll need a band saw, rack repair jack, level, drill, marker, tape measure, hammer or mallet, vacuum, and ratchet. Having these tools ready will facilitate a smooth and efficient repair process.
How do you prepare the damaged rack for repair?
Remove pallets from the damaged rack bay. If the damage is below the first beam level, take out the floor-level pallets on both sides of the damaged frame. If the damage is above the first beam level, remove all pallets from the first level of adjacent bays. Verify that you have the necessary tools and repair kit, and ensure that the hardware is easily accessible.
What is the process for installing the jack and cutting damaged components?
Position the jack at the front of the column and raise it until the pins align with the punch holes. Slide the rear pins through the holes on the jack head. Determine the cut height from the repair kit and mark the damaged frame for cutting. Remove the front anchor nut, jack up the column slightly, and cut the damaged components using a sawzall and portable band saw, following pre-marked lines.
How do you install the pallet rack repair kit?
Slide the repair kit into place and clamp it to the existing column. Insert and hand-tighten bolts for the front and rear column connections. Lower the jack so the column rests on the repair kit’s platform, and do not disconnect the jack yet.
What steps should be followed for tightening and anchoring?
Use an impact wrench to tighten the bolts and drill anchor holes at a slight angle. Hammer the anchors into place and tighten all carriage bolt connections in a “star” pattern. Verify bay spacing, adjust as needed, and install the diagonal strut connection bracket. Drill anchor holes, install anchors at a slight angle, and ensure they meet embedment standards.
What should be done after completing the repair?
Vacuum any remaining debris to prevent it from spreading, hammer the anchors in, and torque them to specification using an impact wrench. Clean up any leftover debris, remove the clamp, and carefully slide the jack out of position. Finally, confirm that all procedures have been followed and that the kit is securely in place.
Conclusion
Using pallet rack repair kits offers a practical and cost-effective way to address damage and maintain the stability of your storage system. By following the outlined steps—from preparing the damaged area and using the right tools to carefully installing and anchoring the repair kit—you can ensure a safe and efficient repair process. Proper maintenance with these kits helps preserve the integrity of your racking system, minimize disruptions, and enhance the overall safety and efficiency of your warehouse operations.