Pallet Storage Solutions

Pallet Rack Upright Damage: Identify, Repair & Replace | Pallet Storage Solutions
⚠️ Safety-Critical: Any forklift-impacted upright must be removed from service before inspection
Pallet Rack Safety & Maintenance Series

Pallet Rack
Upright Damage:
Identify, Repair
& Replace

Forklift clips a rack base. Nobody reports it. The column quietly sits there — loaded — its capacity reduced by an unknown amount. This guide tells you exactly what to look for, when to repair, when to replace, and how to document everything for OSHA compliance.

🚨
Critical Safety Rule
Any pallet rack upright that has been struck by a forklift — even if it appears undamaged — must be inspected by a qualified racking professional before being reloaded.

Visual inspection alone is not sufficient after an impact event.
1/4"
Dent ThresholdDents deeper than this on a flat column face require replacement, not repair
$161K
OSHA Max FinePer willful or repeat violation for knowingly operating damaged rack equipment
$40K+
Avg. Injury ClaimAverage workers' comp cost from a rack collapse injury — before legal fees
Bent pallet rack upright showing forklift impact damage with comparison of repair versus replacement for OSHA-compliant warehouse safety
Section 01

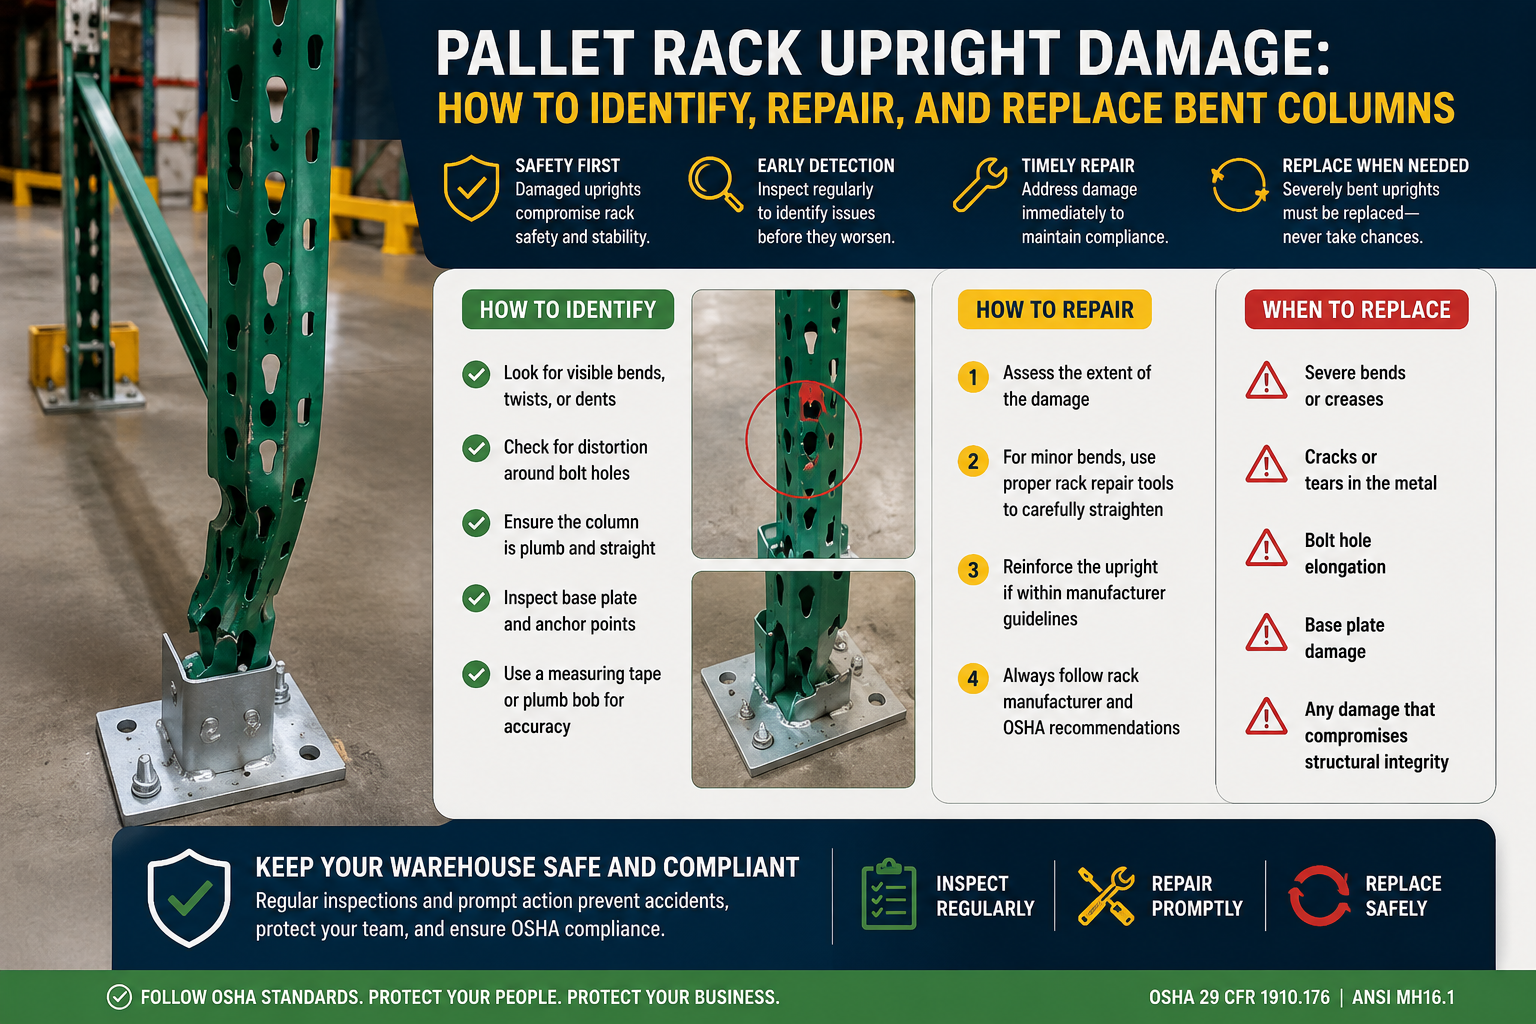
What Pallet Rack Upright
Damage Actually Looks Like

Damage exists on a spectrum — from nearly invisible surface marks that pose no structural threat to catastrophic column failure. Knowing where on that spectrum a given piece of damage falls requires understanding what you're looking at.

👁
Category A
Damage You Can
See Immediately
🔨
Dents & Deformation
Shallow dents under 1/4" on the flat face may be repairable. Anything deeper, or any dent that causes the column to bow, twist, or deflect out of vertical, is a structural failure requiring replacement.
📐
Bowing or Leaning
Step back and sight down the aisle. Any upright that visibly leans, curves, or is out of plumb has exceeded its yield point and cannot be repaired — full replacement required immediately.
🔩
Cracked or Open Welds
Examine weld points where the column meets the base plate. Any cracking, separation, or gap means load transfer to the floor is compromised — this is a mandatory replacement scenario.
Base Plate Movement
If the base plate has shifted, cracked, or anchor bolts have pulled loose from the concrete, the entire upright section is out of compliance regardless of the column's visual condition above.
🟤
Corrosion & Rust
Light surface rust is cosmetic. Rust that has penetrated deeply — pitting, flaking, structural corrosion — reduces load-carrying capacity and requires professional assessment before reloading.
Single Clean Impact — Web Section
A clean impact striking the column at the base in the perforated web area can create an internal stress concentration that isn't visible from outside. This is why post-impact professional inspections matter even when the column "looks fine."
🔄
Cumulative Impact Damage
A column bumped dozens of times by slow-moving equipment may look only lightly scuffed but have significantly reduced column strength from cumulative cold-working of the steel. Photo logs over time reveal this pattern.
🌊
Micro-Cracking from Overloading
Chronic overloading that doesn't cause visible bowing can create stress fractures inside the column steel that are invisible to the naked eye but compromise the column's rated capacity significantly.
🔗
Connector Slot Wear
Teardrop or keystone beam connector slots can deform from repeated impacts or incorrect beam removal. Visually the slot looks intact but the beam no longer locks at rated capacity — requiring replacement of the upright or section.
📏
Out-of-Plumb Lean (Under Threshold)
ANSI MH16.1 permits a maximum lean of 0.5" per 10 feet of height. A column just under this threshold still requires investigation for the cause and monitoring at every subsequent inspection.
⚠️
Professional post-impact inspection is required even when the column looks straight. "Looks fine" is not a structural certification — it's a guess.
Section 02

Damage Severity Classification:
What Each Level Means

Use this framework during every rack inspection to classify damage consistently and determine the appropriate response. Every classification must be documented with a photograph, date, and inspector name.

1
Minor
Surface
Damage
Surface dents under 1/4"
Paint scuffs or scratches
Minor rust spots only
Column remains straight
Monitor at next inspection. Document with photo.
2
Moderate
Structural
Concern
Dents 1/4"–3/4" deep
Slight flare or twist in column
Base plate movement visible
Anchor bolt looseness
Remove from service. Call racking specialist for assessment.
3
Severe
Structural
Failure
Visible bowing or bending >3/4"
Torn or deformed steel
Cracked weld at base plate
Column out of plumb
Evacuate adjacent aisles. Do not reload until replaced.
4
Catastrophic
Emergency
Condition
Column buckled or leaning
Partial collapse occurred
Anchor bolts pulled from floor
Adjacent sections at risk
Full section out of service. Emergency replacement. File incident report.
📷
Documentation is non-negotiable: Every damage classification must be logged with a photograph, the inspector's name, date, and the rack bay location. This record serves as both a compliance log and a baseline for tracking whether conditions deteriorate between inspections. OSHA may request these records during any post-incident investigation.
Section 03

Repair vs. Replace:
Making the Right Call

The financial temptation is always to repair — it's faster and cheaper in the short term. But a repair kit applied to a column that actually needs replacement creates a false sense of security that is genuinely dangerous.

Yes — appropriate action
No — not permitted
Conditional — get expert opinion
Damage Scenario
✅ Repair Kit
🔄 Replace Upright
Notes
Single minor dent, 1/4" or less, column still straight
Yes
Optional
Repair kit restores capacity if installed correctly per manufacturer spec with professional sign-off
Dent with visible column bow or twist
No
Required
Bowing means column has exceeded yield strength — structural integrity permanently lost
Base plate damaged or anchor bolt holes elongated
No
Required
Anchor integrity is non-negotiable — replacement with correct base plate and new anchors required
Multiple dents on same column
No
Required
Cumulative damage compounds stress concentration — even if each individual dent is under threshold
Used/unknown history upright with surface damage
No
Required
Cannot verify pre-existing load history or prior impacts — replacement is the only safe option
Cracked weld at upright-to-base connection
No
Required
Weld failure means load transfer to floor is compromised — immediate replacement, no exceptions
Post-forklift impact, column still appears straight
Conditional
Recommended
Have a racking professional assess before deciding — visual straight ≠ structurally sound after impact
⚖️
The guiding principle: When in doubt, replace. The cost of a replacement upright ($400–$1,200 installed) is always lower than the liability of a rack failure under load. A repair kit is not a judgment call — it's a precisely defined solution for a specific, limited damage scenario.
Section 04

How to Use a Pallet Rack Upright
Repair Kit: Step-by-Step

When a repair kit is the appropriate solution — minor dent, column structurally straight, manufacturer-approved kit available for your rack brand — follow this process precisely. There are no shortcuts in structural repair.

1
Step 01 · Critical
Unload the Rack Section Completely
Never install a repair kit under load. Collapse risk during installation on a loaded section is extreme — every beam level must be cleared first.
2
Step 02 · Critical
Tag "Out of Service — Do Not Load"
Prevents accidental reloading during the repair process. Visible signage on both ends of the bay is required under OSHA standards.
3
Step 03
Confirm Kit Is Manufacturer-Approved
Mismatched kits void the repair's load rating. Match by upright brand, column dimensions, steel gauge, and damage location — all four criteria.
4
Step 04
Clean Damaged Area Thoroughly
Remove rust, debris, and paint from the damage zone. Full metal-to-metal contact is required for the repair collar to achieve its rated capacity.
5
Step 05
Position Collar Over Damage Zone
Align per manufacturer instructions. Improper positioning shifts stress to adjacent column steel and creates new failure points outside the repair zone.
6
Step 06 · Critical
Torque Fasteners to Spec Values
Under-torqued bolts allow movement under load and lead to fatigue failure over time. Use a calibrated torque wrench — not an impact driver at full setting.
7
Step 07
Photograph Completed Installation
Documentation supports load placard compliance and OSHA readiness. Include date, rack location, and kit model number in the photo record.
8
Step 08 · Critical
Get Professional Sign-Off Before Reloading
Written certification from a racking professional protects your business, confirms safe working load, and satisfies OSHA compliance documentation requirements.
Need the right repair kit for your rack brand? Pallet Storage Solutions stocks manufacturer-approved repair kits for all major teardrop, keystone, and structural upright brands across the US.
Shop Repair Kits →
Section 05

Choosing the Right Repair Kit:
4 Mandatory Match Criteria

Not all repair kits are interchangeable. A kit designed for a 3-inch × 1-5/8-inch teardrop upright cannot be used on a 3-inch × 3-inch structural column. You must confirm all four criteria before installation — if any are unknown, contact your racking supplier before proceeding.

01
Upright Brand & Product Series
Teardrop, keystone, or structural style — and the specific manufacturer product line (e.g., Unarco, Interlake, Lyon, Ridg-U-Rak). Different series from the same brand are not interchangeable.
02
Column Width & Depth Dimensions
The exact cross-section of the upright column — typically expressed as width × depth in inches (e.g., 3" × 1-5/8"). Verify against the original installation drawings or manufacturer data plate.
03
Steel Gauge (Material Thickness)
Light duty, standard, and heavy duty uprights have different steel thicknesses. A repair collar sized for standard gauge steel on a heavy duty column will not achieve the rated capacity shown on the kit spec sheet.
04
Location of Damage on Column
Base section, mid-column, and near beam connector locations each have different structural dynamics. Base repair kits and mid-column kits are different products — confirm the damage location before ordering.
Non-Negotiable Rule
If You Can't Confirm All Four — Don't Install
If you cannot confirm all four matching criteria with the kit manufacturer's specification sheet, do not install the kit. An incorrectly matched repair kit can create a false sense of security while leaving the column at reduced structural capacity.
A mismatched repair kit does not restore rated load capacity — it creates the appearance of repair while the column remains structurally compromised.
Always request the kit's engineering documentation before purchase — not just the product catalog page
Confirm the kit supplier can certify the load rating of the repaired section in writing
If any criterion cannot be confirmed, order a replacement upright instead — the cost difference rarely justifies the risk
Keep kit documentation on file as part of your OSHA compliance records for the rack bay
Section 06

When You Need Full Upright
Replacement: What to Expect

Full upright replacement is more involved than installing a repair kit, but it is a straightforward process when planned properly. In a live warehouse environment with proper staging, a single upright replacement typically takes 1–5 business days from order to certified reinstallation.

Rapid Response Service
Need a Replacement Upright Fast?
We stock common upright sizes and can provide a same-day quote for your brand, height, and gauge. Professional installation available across the US.
Get a Rapid Quote →
🔄 Full Upright Replacement — Step-by-Step Sequence
1
Unload the Affected Section Completely Critical
Every beam level must be cleared before any structural work begins. No partial unloading — the entire frame row comes out of service.
2
Tag Section Out of Service Critical
Place clear "Do Not Load" signage on both ends of the bay and lock out adjacent aisles if the rack configuration shares structural elements.
3
Notify Adjacent Aisle Workers
Depending on rack configuration, neighboring sections may need partial unloading as a safety buffer during disassembly and reinstallation.
4
Order the Correct Replacement Upright
Provide your supplier with exact brand, series, height, and gauge. Confirm base plate and anchor bolt specification match your existing installation drawings before ordering.
5
Remove the Damaged Upright
Disassemble beams and bracing on the affected frame, extract the old upright, and clean the concrete anchor points. Inspect anchor holes for elongation or damage before proceeding.
6
Install and Anchor New Upright to Spec Critical
Anchor to floor per manufacturer engineering specifications. Do not reuse old anchor bolts if they show any signs of damage or elongation — new anchors only.
7
Reinstall Beams — Confirm All Safety Pins Engaged
Every beam connector must have its safety pin or lock fully engaged. Missing safety pins are an OSHA violation — do not skip this verification step.
8
Professional Inspection & Certification Before Reloading Critical
A racking professional must inspect and certify the installation in writing before any product returns to this section. Written certification is your OSHA compliance document.
9
Update Load Placard if Engineering Parameters Changed
If the replacement changes any engineering parameters (different gauge, different upright height, new anchor bolt spec), the rack bay's load placard must be updated to reflect the new certified ratings.
Section 07

Repair & Replacement Costs:
The Real Numbers

The most common reason managers delay addressing upright damage is cost uncertainty. Here's a realistic breakdown of US market costs — and the liability numbers that put them in context.

Emergency Out-of-Service
Immediate action
Always the first action — cost of NOT acting is worker injury and OSHA citations
$0
upfront cost
Frame Repair Kit (DIY)
Same day installation
Minor single dent only — manufacturer-approved kit + professional sign-off required
$80–$200
per kit
Professional Repair Service
1–3 business days
Moderate damage — certified documentation for OSHA compliance included
$300–$800
per upright
Single Upright Replacement
1–5 business days
Severe damage, bowing, or base plate compromise — no repair kit applicable
$400–$1,200
installed
Full Frame Section Replacement
3–10 business days
Multiple damaged columns, obsolete rack brand, or system upgrade opportunity
$800–$3,000+
installed
$16,131
OSHA Serious citation per violation — for knowingly operating damaged rack equipment
$161,323
OSHA Willful or Repeat citation — prior documented damage that was ignored
$40,000+
Average workers' comp claim from a rack collapse injury — before legal fees
Section 08

Preventing Upright Damage:
Protecting Your Investment

Every upright that gets hit costs money, downtime, and risk. A prevention program costs a fraction of repeated repair cycles. Here's where to focus your effort for the highest return.

🛡
Prevention 01
🛡
Install Column Guards & Rack Protectors
Heavy-duty steel or HDPE column protectors bolted to the floor at every upright base — especially at aisle ends — are the single most cost-effective rack protection investment available. They absorb forklift impacts before the steel does.

End-of-aisle rack guards and safety barriers protect the most vulnerable positions: corner uprights at the opening of each rack row that face direct exposure to forklift turns.
Column guard: $30–$80 vs. upright replacement: $400–$1,200
🖊
Prevention 02
🖊
Floor Marking & Aisle Management
Clear, high-visibility floor markings that delineate rack areas from forklift travel paths significantly reduce incidental contact. The most impactful positions to mark are end-of-aisle turning zones where forklifts are most likely to clip corner uprights.

Add convex safety mirrors at blind corners and rack row intersections where forklift sightlines are limited by the rack structure itself.
OSHA requires visible aisle markings — missing markings = citable violation
🧑
Prevention 03
🧑‍🏭
Operator Training & Impact Reporting Culture
The most important prevention tool isn't a physical guard — it's a warehouse culture where operators report every impact immediately without fear of consequences. Delayed reporting turns a minor dent (repair kit, $150) into a catastrophic failure (rack collapse, litigation, OSHA investigation).

Build a simple, blame-free impact reporting process: fill out a card or digital form, section gets tagged, supervisor notified, inspection happens within the shift.
Immediate reporting = minor repair. Delayed reporting = potential collapse
📋
Prevention 04
📋
Regular Formal Inspection Programs
Formal monthly rack inspections that specifically document upright condition — including photographs of any marks, scuffs, or dents — create a baseline record. Damage that appeared between one inspection and the next can be traced to the responsible equipment or time period.

Patterns of repeated damage in the same location signal a layout or process problem that needs addressing at the source — not just a series of individual repair events.
Annual professional inspection: ANSI MH16.1 minimum expectation
Section 09

OSHA & ANSI Compliance:
What the Standards Require

Two regulatory frameworks govern how US warehouses must respond to rack upright damage. Compliance isn't just about avoiding fines — a damaged upright collapse triggers a mandatory OSHA investigation of your entire facility.

⚖️
29 CFR 1910.176(b)
OSHA General Industry — Materials Handling
Requires that safe load limits be maintained and that storage equipment not be used in a manner that creates a hazard. A damaged upright that remains in service under load is a direct violation of this standard — regardless of whether a collapse has occurred.
What This Means in Practice
Any rack with a structurally damaged upright must be unloaded and tagged out of service immediately — not at the end of the shift
The damaged section cannot be reloaded until a qualified person confirms repair or replacement is complete and certified in writing
OSHA inspectors look for evidence that management knew about the damage and chose to continue operations — willful violation triggers the $161K fine category
📋
ANSI MH16.1
Rack Manufacturers Institute Engineering Standard
Specifies that damaged rack components must be removed from service immediately and may only be returned after repair or replacement by a qualified person. Field-fabricated repairs are explicitly not permitted — only manufacturer-approved components.
What This Means in Practice
Welding a plate over a dent, shimming a bent upright, or improvising a repair with non-approved hardware is a clear ANSI violation
"Qualified person" means a professional with specific racking engineering knowledge — not a general maintenance team member
The load placard must be updated if any repair or replacement changes the engineering parameters of the rack bay
Penalty Structure — 2025 OSHA Fine Amounts
Other-Than-Serious (missing placard, minor housekeeping)
$16,131
Serious violation (damaged upright knowingly in service)
$16,131
Willful / Repeat (documented damage, management ignored)
$161,323
Failure to Abate (not corrected by OSHA deadline)
$16,131/day
Section 10

Frequently Asked
Questions

Answers to the most common questions about pallet rack upright damage — optimized for fast, clear guidance when you need it most.

🏗
Discovered a Damaged Upright?
Don't wait. We provide professional rack damage assessments, manufacturer-approved repair kits, and full upright replacement services for warehouses across the US.
Get a Rapid Response Quote →
Look for visible dents, bowing, twisting, or leaning in the column steel. Check the base plate for movement or cracks and inspect anchor bolts for signs of pulling away from the floor. Any deformation beyond minor surface dents — especially any curvature in the column — means the upright must be removed from service immediately.
Only in specific cases. Minor dents less than 1/4 inch deep on a column that remains structurally straight may be addressed with a manufacturer-approved repair kit. Any bowing, twisting, base plate damage, or cracked welds require full upright replacement. When in doubt, replace — a repair kit does not restore a structurally compromised column.
A pallet rack upright repair kit is a manufacturer-designed steel collar that bolts around a minor dent in a rack column to reinforce the damaged section and restore its rated load capacity. Repair kits must be matched to the specific rack brand, column size, and steel gauge, and installed per the manufacturer's torque specifications.
Yes. OSHA 29 CFR 1910.176 prohibits the use of equipment in a condition that could create a hazard. A structurally damaged upright constitutes exactly that. ANSI MH16.1 further specifies that damaged rack components must be removed from service immediately and not returned until repaired or replaced by a qualified person.
A single upright replacement typically costs $400–$1,200 installed, depending on upright height, gauge, and supplier. A full frame section replacement runs $800–$3,000 or more. These costs are significantly lower than OSHA fines for willful violations ($161,323 per citation) or the liability exposure from a rack collapse injury.
No. Any rack section with a structurally damaged upright must be unloaded and tagged out of service immediately. Do not continue using adjacent bays if they share the same frame row as the damaged column. Reload only after a qualified racking professional has confirmed the repair or replacement is complete and certified in writing.
A single upright replacement typically takes 1–5 business days from order to installation, depending on parts availability and whether your rack brand and size is in stock. Keeping common replacement uprights on hand — or working with a supplier who does — reduces downtime significantly after a forklift impact event.
The most common cause is forklift impact — a counterbalance forklift or reach truck striking a column during loading, unloading, or travel. Other causes include chronic overloading that exceeds the column's rated capacity, seismic movement in earthquake-prone regions, and base plate anchor failure that allows the column to shift under load.
Installing a manufacturer-approved repair kit is within the capability of a trained maintenance team, but the process must follow the manufacturer's specifications exactly — correct kit for your rack brand, proper surface preparation, and torque values. Regardless of who installs it, a certified racking professional should inspect and sign off before the section is returned to service.
Install column guards or rack protectors at every upright base — especially at aisle ends where impacts are most frequent. Use rack end guards and end-of-aisle barriers. Establish clear aisle width markings and forklift speed limits. Conduct regular operator training focused on rack clearance awareness and build a blame-free impact reporting protocol so damage is caught early.
Scroll to Top